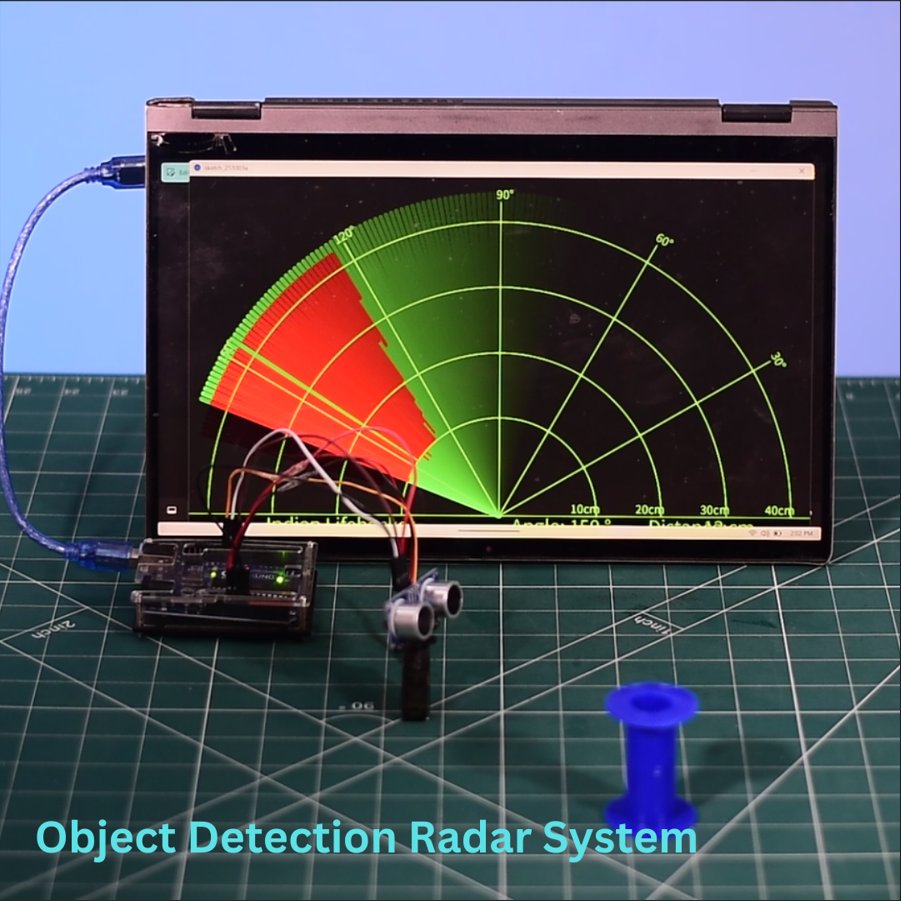


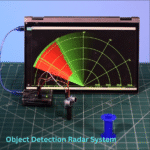
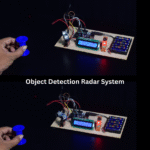

Arduino radar style scanning ultrasonic sensor Arduino object detection radar 0-180°
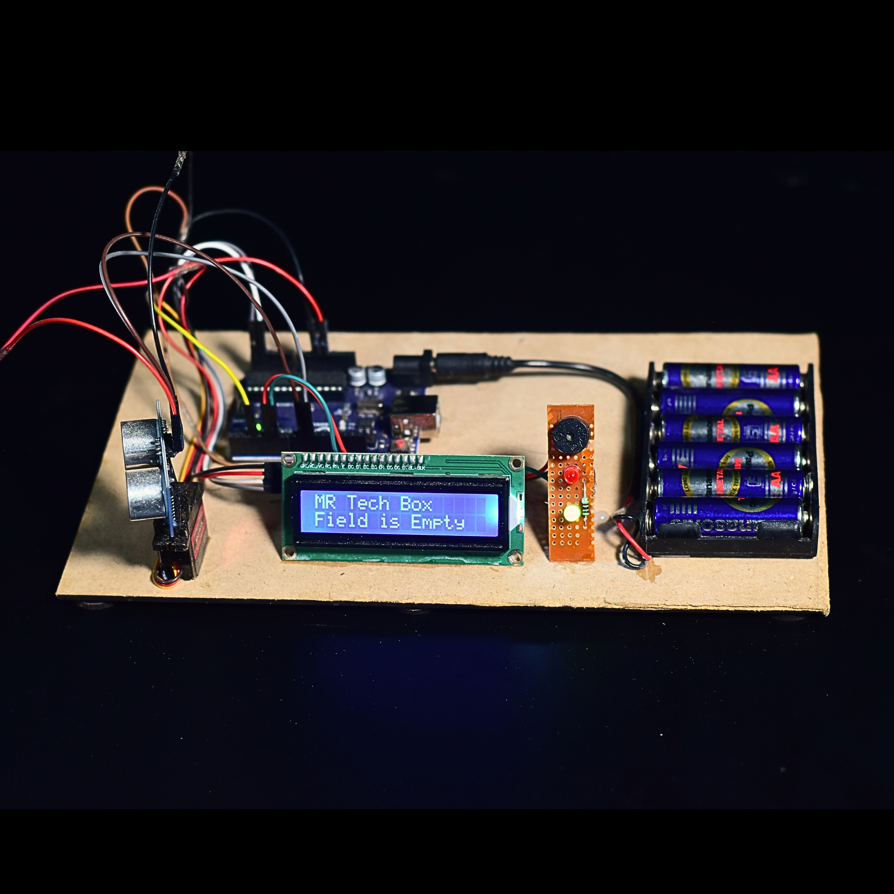
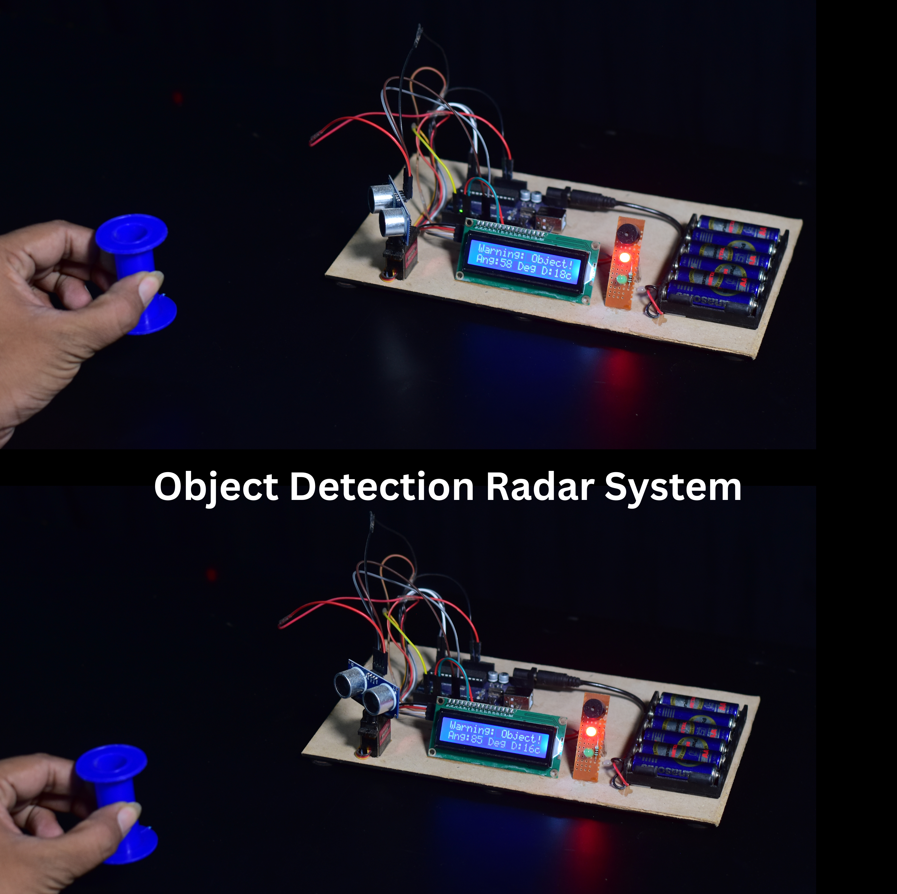
This project is based on an Object Detection Radar System which uses an Ultrasonic Sensor mounted on a Servo Motor controlled by an Arduino Uno. The servo motor continuously rotates from 0° to 180° to scan the surroundings, similar to a radar system. When any object comes within the sensing range (40 cm), the ultrasonic sensor detects it, and the servo motor immediately stops at that specific angle. The system then displays the detected object’s distance and angle on the I2C Display.
Terms & Conditions: Our project kits are designed for educational and demonstration purposes only. The projects created using these kits represent prototype ideas and concepts. They are not ready-to-use real-life products. To use any project in real-world applications, further research, development, and testing may be required. By purchasing this kit, the buyer agrees that the project is intended only for learning and experimental use.
Original price was: ₹4,499.00.₹3,499.00Current price is: ₹3,499.00.
This project implements a compact object‐detection radar system using the Arduino Uno platform, an ultrasonic distance sensor, a servo motor and an I²C display. The ultrasonic sensor is mounted on the servo shaft and continuously sweeps through an angular range (0° to 180°) to scan the environment, similar to how a radar antenna sweeps its beam. At each angular step, the sensor emits an ultrasonic pulse and measures the return echo time to compute the distance to any object in the path.
When an object falls within a pre‐set sensing range (for example, 40 cm), the servo motion immediately stops at the current angle. The system then captures the angle of detection and the measured distance, and displays this information in real time on an I²C‐connected LCD (or OLED) display. Thus, the user can see both how far the object is and at what angle relative to the scanning baseline it was detected.
The scanning mechanism and the display feedback together give the impression of a miniature radar: the servo acts as the rotating beam, the ultrasonic sensor as the “radar pulse emitter/receiver,” and the I²C display as the output unit providing relevant data. The system is useful in obstacle detection, robotics, security or automation tasks where spatial awareness is required within a short range.
Terms & Conditions: Our project kits are designed for educational and demonstration purposes only. The projects created using these kits represent prototype ideas and concepts. They are not ready-to-use real-life products. To use any project in real-world applications, further research, development, and testing may be required. By purchasing this kit, the buyer agrees that the project is intended only for learning and experimental use.
Related Products
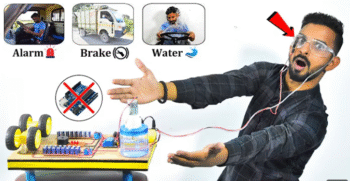
It has been shown in this project that if the driver tries to sleep, as soon as he closes his eyes for more than 3 seconds, an alarm will start ringing which will make him open his eyes and if he still does not open his eyes, after that driver vehicle automatic stop and water will splash on his face which will open his eyes and then he will not try to sleep again.
Terms & Conditions: Our project kits are designed for educational and demonstration purposes only. The projects created using these kits represent prototype ideas and concepts. They are not ready-to-use real-life products. To use any project in real-world applications, further research, development, and testing may be required. By purchasing this kit, the buyer agrees that the project is intended only for learning and experimental use.
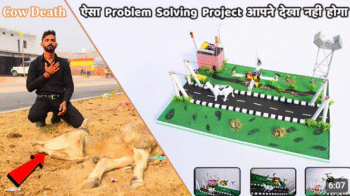
The Cow Drone Safety system is a cutting-edge technology designed to improve the safety and well-being of cattle on farms. By utilizing drones equipped with advanced sensors and monitoring capabilities, this system aims to revolutionize the way farmers manage their livestock. In this project, we will explore the design, functionality, and potential benefits of the Cow Drone Safety system.
Terms & Conditions: Our project kits are designed for educational and demonstration purposes only. The projects created using these kits represent prototype ideas and concepts. They are not ready-to-use real-life products. To use any project in real-world applications, further research, development, and testing may be required. By purchasing this kit, the buyer agrees that the project is intended only for learning and experimental use.
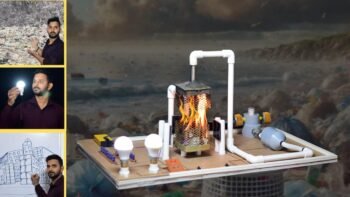
Project Key Features: Waste Plastic Bag Collection: Plastic bags, which are typically waste material, are collected to prevent them from polluting the environment.
Electricity Generation: The plastic bags are burned to generate electricity. This process contributes to renewable energy production.
Pollution Control and Ink Production: The emissions released during the burning process are filtered and treated to create high-quality ink in an eco-friendly manner.
Road Construction Using Waste Materials: Recycled plastic bags and other waste materials are used to build sustainable roads. These roads are more durable and require less maintenance than traditional roads.
Environmental Benefits: The project helps reduce environmental pollution by efficiently managing waste and generating clean energy.
Economic Value: The recycling of plastic adds economic value, benefiting local economies and creating new jobs.
Sustainable Future: The project aims to create a more sustainable and eco-friendly future, where waste is properly utilized and environmental harm is minimized.
Project Benefits: Waste Management: Efficient disposal and utilization of waste plastic bags. Energy Generation: Clean, renewable energy production. Pollution Reduction: Emissions are controlled, and ink is produced in a safer, environmentally friendly way. Cost-Effective Infrastructure: Roads built from recycled materials are cost-effective and long-lasting. Environmental Impact: Reduces carbon footprint by providing eco-friendly solutions. This project offers a new perspective on waste management and sustainability, providing positive environmental impacts while supporting economic growth.
Terms & Conditions: Our project kits are designed for educational and demonstration purposes only. The projects created using these kits represent prototype ideas and concepts. They are not ready-to-use real-life products. To use any project in real-world applications, further research, development, and testing may be required. By purchasing this kit, the buyer agrees that the project is intended only for learning and experimental use.
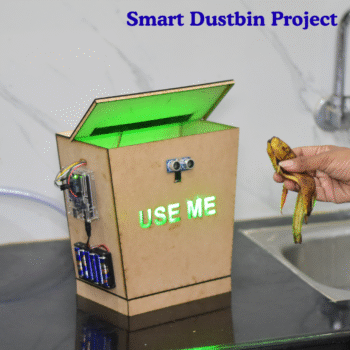
The Smart Dustbin is an Arduino-based automatic waste bin that opens its lid automatically when someone comes near it using an ultrasonic sensor and servo motor. A green LED light glows with the message “USE ME” to guide users. This touchless system promotes hygiene, reduces manual contact, and encourages cleanliness in homes and public areas.
Terms & Conditions: Our project kits are designed for educational and demonstration purposes only. The projects created using these kits represent prototype ideas and concepts. They are not ready-to-use real-life products. To use any project in real-world applications, further research, development, and testing may be required. By purchasing this kit, the buyer agrees that the project is intended only for learning and experimental use.

1. Introduction: In today’s world, the growing concern for environmental sustainability has led to the development of renewable energy solutions. Electric vehicles (EVs) have gained popularity as an eco-friendly alternative to traditional gasoline-powered cars. However, one of the challenges faced by EV owners is the limited range due to battery constraints. To address this issue, we have developed a groundbreaking project – a solar-powered wireless charging system that can provide emergency charging to electric vehicles using a remote-controlled (RC) robotic car.
Terms & Conditions: Our project kits are designed for educational and demonstration purposes only. The projects created using these kits represent prototype ideas and concepts. They are not ready-to-use real-life products. To use any project in real-world applications, further research, development, and testing may be required. By purchasing this kit, the buyer agrees that the project is intended only for learning and experimental use.
The name of this project is safety helmet. Mainly work of this project is safety of a rider. We make a connection between bike and helmet by using the sensors. When rider will wear the helmet then our bike start. If the rider will not wear the helmet then bike will not start. We use the indication system in the helmet also. Indication system will show you wear the helmet properly or not. So it’s good for safety purpose and we safe it from thief also. Because without helmet bike will not start.
Terms & Conditions: Our project kits are designed for educational and demonstration purposes only. The projects created using these kits represent prototype ideas and concepts. They are not ready-to-use real-life products. To use any project in real-world applications, further research, development, and testing may be required. By purchasing this kit, the buyer agrees that the project is intended only for learning and experimental use.
Welcome to our Smart Inverter Project tutorial! In this video, we’ll show you how to build a DIY inverter that provides an automatic power backup solution for your home. If you’re looking for a continuous power supply during outages, this inverter with battery storage will keep your lights on even when the main power goes out.
This project involves creating a smart inverter circuit that can seamlessly switch from AC power to a 12V DC battery when the electricity supply is interrupted. Not only does it ensure uninterrupted power to your 230V AC appliances, but it also recharges the battery when the main power is available.
In this detailed how-to guide, we cover everything from the basic components needed to the step-by-step assembly and testing of the inverter. Plus, we’ll discuss how this inverter system can be adapted for use in transmission lines, ensuring a reliable power supply to cities from substations, even if the main transmission line fails temporarily.
What You’ll Learn in This Video:
Inverter Basics: Understand how an inverter works and the role of battery storage in providing continuous power.
Step-by-Step Construction: Follow our easy instructions to build your own inverter circuit with a 12V DC battery backup.
Automatic Switching: Learn how the inverter automatically switches to battery power during outages and back to AC power when available.
Practical Applications: Discover how this smart inverter system can be used in transmission lines to maintain city power supply during disruptions.
Terms & Conditions: Our project kits are designed for educational and demonstration purposes only. The projects created using these kits represent prototype ideas and concepts. They are not ready-to-use real-life products. To use any project in real-world applications, further research, development, and testing may be required. By purchasing this kit, the buyer agrees that the project is intended only for learning and experimental use.
Design and Operation: VAWTs typically consist of two or more blades that rotate around a vertical axis. The blades can have different shapes, such as straight, helical, or S-shaped, and are attached to a central shaft. As the wind blows, the blades capture the kinetic energy and convert it into mechanical rotation, which can then be used to generate electricity through a generator or to perform other tasks directly.
Terms & Conditions: Our project kits are designed for educational and demonstration purposes only. The projects created using these kits represent prototype ideas and concepts. They are not ready-to-use real-life products. To use any project in real-world applications, further research, development, and testing may be required. By purchasing this kit, the buyer agrees that the project is intended only for learning and experimental use.


In This Project Our Purpose is for showing how we can protect our forest , In This Project we show a device that device can listen gun sound and activate the sound alarm , this device is amazing , when we use in our forest this device then if any one come for huntering , when we use gun for killing animals then that device capcher the gun sound and transfer the signal to near forest department and there are available receiver so alarm start in forest department so there everyone understand someone enter to forest for huntering animal and he run for stop huntering , this is best device for stop huntering
Terms & Conditions: Our project kits are designed for educational and demonstration purposes only. The projects created using these kits represent prototype ideas and concepts. They are not ready-to-use real-life products. To use any project in real-world applications, further research, development, and testing may be required. By purchasing this kit, the buyer agrees that the project is intended only for learning and experimental use.

In this project, you will see a 4-way traffic light control system with an advanced safety feature – traffic spikes/barriers. When the signal is red, the spikes stay up to stop vehicles from breaking rules. If anyone tries to cross, their vehicle can get a flat tyre. 🚗❌ When the light turns green, the spikes go down, and vehicles can move safely.
Terms & Conditions: Our project kits are designed for educational and demonstration purposes only. The projects created using these kits represent prototype ideas and concepts. They are not ready-to-use real-life products. To use any project in real-world applications, further research, development, and testing may be required. By purchasing this kit, the buyer agrees that the project is intended only for learning and experimental use.


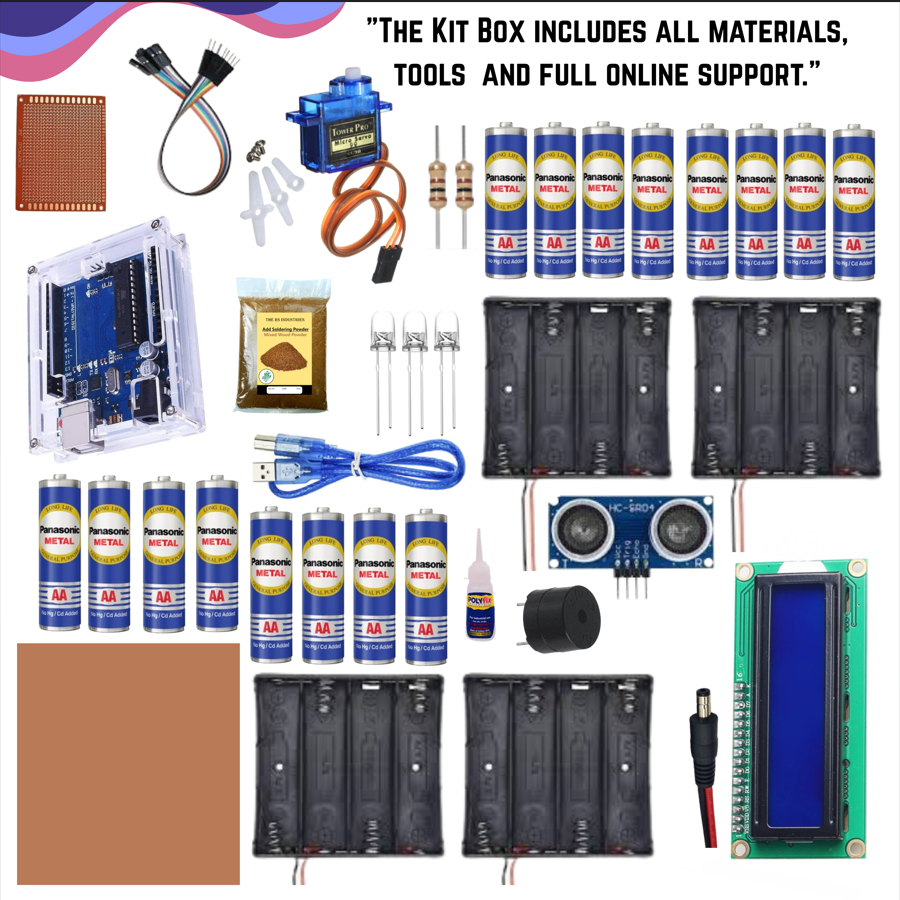
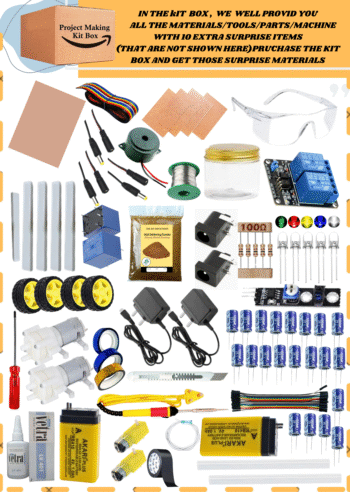
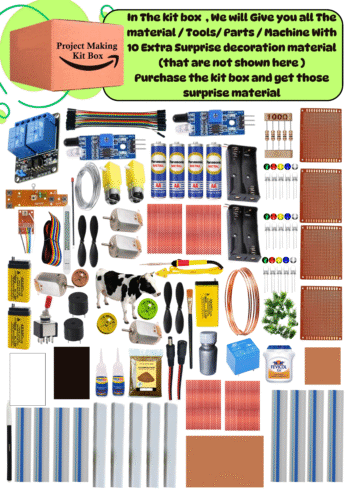
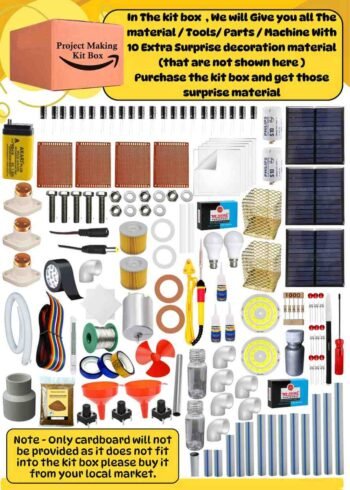
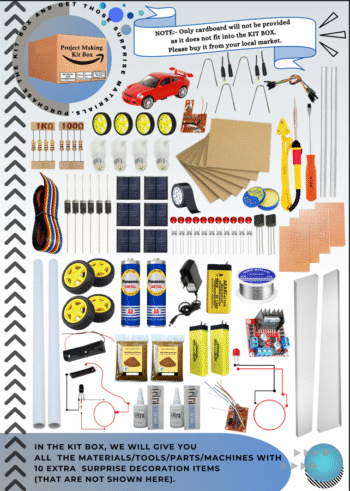
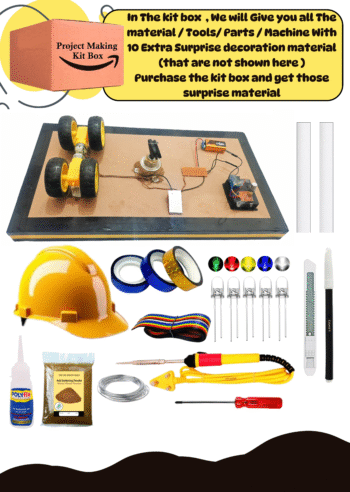
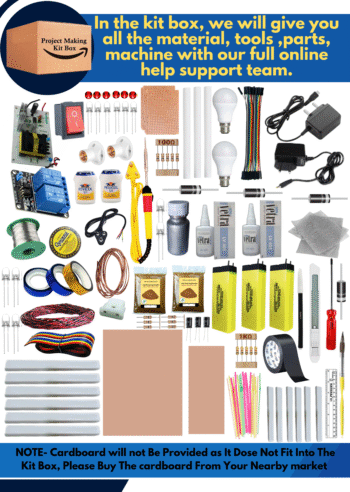
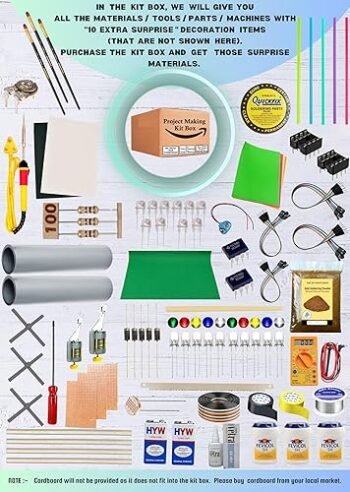
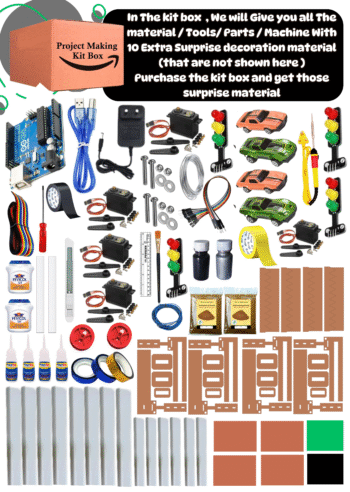
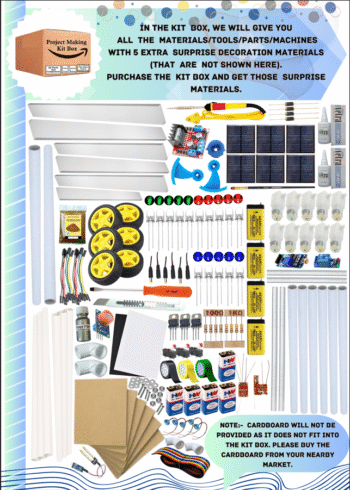
I Will Provide You All Components , Parts , Machines , Tools , Decoration Materials Available In Kit Box .
I Will Provide You All Components , Parts , Machines , Tools , Decoration Materials Available In Kit Box . Than I will provide You full Step By Step Making Video + Report File + Synopsis File + Making Video My Team Help You
We Will Give You In Kit Box All Materials/Parts/Machines/Tools With (10 Extra Surprise) Decoration Materials . That Not Showing Here Buy Kit Box & Get That Surprise Materials
Terms & Conditions: Our project kits are designed for educational and demonstration purposes only. The projects created using these kits represent prototype ideas and concepts. They are not ready-to-use real-life products. To use any project in real-world applications, further research, development, and testing may be required. By purchasing this kit, the buyer agrees that the project is intended only for learning and experimental use.

Introduction: We have developed this project based on India’s Chandrayaan mission. This project is a part of a professional and technical campaign showcasing India’s presence in international space exploration. In this project, we have created a model based on the fundamental concepts of the Chandrayaan mission.
Terms & Conditions: Our project kits are designed for educational and demonstration purposes only. The projects created using these kits represent prototype ideas and concepts. They are not ready-to-use real-life products. To use any project in real-world applications, further research, development, and testing may be required. By purchasing this kit, the buyer agrees that the project is intended only for learning and experimental use.
Reviews
There are no reviews yet.